I installed ubuntu on my home desktop recently. While doing so I choose the “Replace Windows …” option which like title suggests, should have just replaced the windows partition with a ubuntu partition and should have kept everything intact (or so I thought). However, in reality the option is misleading and is actually used to format the whole drive and use all of it for linux. It is like doing a fresh single boot install of ubuntu on your machine. I would highly advise against using this option even though it is the second suggested option (issue with user experience).
In my 500 GB HDD I had 4 partitions:
C:\ – Windows, ~50 GB
D:\ – Personal files, ~200 GB
E:\ – Personal files, ~195 GB
F:\ – Backup files ~ Rest
I wanted to just replace Windows and instead have Ubuntu on my C:\ drive. Also, I wanted to keep all my data in the other partitions. However, using the “Replace Windows…” option was disastarous and I ended up with one large linux partition of size ~490GB. I spent the rest of the day, trying to recover parts of my original data.
This is when I found out about testdisk, a utility for recovering files and lost partitions from a device. The utility is suggested in many threads related to solving the exact same problem I was having [1,2,3]. After digging through the step by step wiki as well as going through many other links [4,5,6] I recovered many important files from my partitions. This video guide was also very helpful.
Some important things to note while doing the recovery are:
DO NOT USE the HDD once you realize the partitions were removed or corrupted.
Have another external storage device like HDD or USB stick which can store the data you want to recover.
Have a Live Ubuntu USB Image. [You will need to boot using this and not use the HDD of your computer. ]
Have an internet connection. [Or else you need to have an executable of testdisk with you]
Boot into the live ubuntu and open software and updates, and make sure the “Universe” repository is checked. [3]
Run the following commands “sudo apt-get update” and “sudo apt-get install testdisk”
Once testdisk is installed you need to run it as administrator “sudo testdisk”
Follow the steps in
Quick search might not yeild best results especially if your Ubuntu was installed over your windows partitions.
Try Deeper Search [Be warned this will take a lot of time depending on your HDD size, mine took around 1.5 Hrs]
Once finished it should probably list your original partitions usually with first column of results as HDFS – NTFS.
You can go inside each partition and look at the files using option “P”. You can also mark paritions for deletion or as Logical Drive using the Left/Right arrow keys.
I used the list files option and copied all important files from my partitions to my external HDD. This will take some time depending on the data you need. I recovered ~5000 photos and few 100 documents and ~5000 other files. The process was easy and the external HDD had the correct files stored.
My attempt to recover full partitions, failed with Invalid partition sectors error. However, I was happy with the capabilities of the tool and its user friendly approach. I believe, it would have been possible to recover my partitions as well but I made some mistake on my side.
Overall, testdisk is a great utility and is recommended for recoveing files which you accidently deleted or lost during partition deletion. It is recommended by the Ubuntu data recovery page as well.
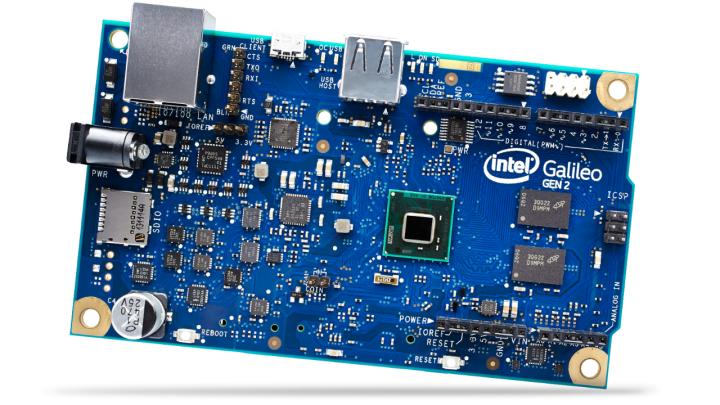
This semester I have signed up for the course INFO 490: DIY with Galileo Development Boards which is a DIY fun course on trying to use the latest Intel Galileo Gen 2 board for variety of playful and useful purposes. I will be trying to document this course in the series of blog posts starting with this post about getting started with the board.
Introduction to Intel Galileo Gen 2:
The intel galileo gen 2 board is a step ahead of the regular embedded systems development boards like Arduino and Raspberry pi in the sense that that is has the full capabilities of Arduino as well as the Intel Quark processor with 256 MB DDR3 RAM. The board thus allows the capabilities of controlling embedded circuits as one would do with an Arduino along with running a linux image which can also be used for controlling the Arduino style GPIO pins on the board. There are tons of resources both on the Galileo website as well as some good tutorials on Sparkfun on how to connect the board and use a demo sketch to use the Arduino side of things as well as details about running a large Linux image on it to do complicated stuff like connecting to the internet. The following are some resources which one can use to get their Galileo board up and running:
Sparkfun Getting Started – How to get the Arduino Blink example and how to access the console of the board via serial port.
Intel Galileo community – This is a good community to get most of your problems solved regarding the board and also to interact with the makers and other developers using the board.
This is an important and useful thing to learn and configure on the board. If you plan on using more than the Arduino interface and try the Linux interface of the board you will get a lot more flexibility. There are 2 ways to use the console of the board. One is using the Serial port to access the console and another is using SSH connection over ethernet port to the bigger Linux image. Below I will try to explain in detail how to use the SSH over ethernet port which is a much smoother way and can also be use over the network. The usage of serial port can be found on the Sparkfun Getting Started page.
In order to get the SSH connection working you will need the following:
Ethernet Cable
Arduino IDE for Galileo configured using any of the getting started
An SD card with at-least 1-2GB memory with the Bigger Linux Image downloaded from the Intel Download page
Now start the board with the Linux Image on the SD card loaded and upload the first of the following sketches [SSH_IP.ino] to the board:
This file contains bidirectional Unicode text that may be interpreted or compiled differently than what appears below. To review, open the file in an editor that reveals hidden Unicode characters. Learn more about bidirectional Unicode characters
This file contains bidirectional Unicode text that may be interpreted or compiled differently than what appears below. To review, open the file in an editor that reveals hidden Unicode characters. Learn more about bidirectional Unicode characters
This file contains bidirectional Unicode text that may be interpreted or compiled differently than what appears below. To review, open the file in an editor that reveals hidden Unicode characters. Learn more about bidirectional Unicode characters
This code will configure the IP address of the board as 169.254.0.2 and you should also set the Ethernet IP of your own computer to 169.254.0.1 and use the subnet mask as 255.255.0.0 for both the systems. The code also starts the SSH service on the board which will allow it to accept SSH connections.
Using the second code above [SSH_IP_LISTEN.ino] one can track what is the current IP of the board. This will be useful for the case when you have the IP of the board configured over a DHCP (usually when you connect it to your home router).
A good way to configure the board would be for it to use a static IP when connected to the computer over ethernet and to use DHCP when connected to the router.
For this to work when you SSH into the board using ssh pi@169.254.0.2 you can edit the following file /etc/network/interfaces to the contents of the file 3 [interfaces] shown above. After this you might loose your current SSH connection. Just press the reboot button on the board and wait for it to load again. Once the board has booted up you can either load the 2nd sketch [SSH_IP_LISTEN.ino] and open the Serial Monitor to see the IP of the board and connect to that IP (this IP will usually be different from the static IP you have set up earlier) via SSH. You can also find the IP of your board by logging into your router admin account and checking the IP of the device which is named after the board (default: clanton).
Once you have the SSH running you can try using the various options you get for controlling the board using the command line. I will try to add more info on playing around with the board via linux in future posts.
So, Arnab kept asking about Rahul’s opinion on Modi, 1984 riots and Ashok Chavan and Rahul fought him back with RTI, women empowerment and broader system related questions from his armory. This is how one of India’s recent probably “Once in a Lifetime” faceoff between 2 social media hot favorites ended. The unstoppable force versus the immovable object. I present a data based analytics of the whole proceeding.
It has been almost a week since Rahul Gandhi’s interview with Times Now journalist Arnab Goswami was published on Youtube. For those of you who haven’t seen the recent hot thing in Indian politics should spend some 1.5 hours of your time studying the psych of the Vice President of our current party.
Since its publishing the video has garnered more than 1.7 million views and its has has been quite a viral thing in the days following the actual interview.
This has also allowed the politically engrossed Indian masses on social media to share their sentiments about Rahul Gandhi and his interview. The comments in my friend groups have been mostly funny and quite humorous. A majority of them have claimed that the interview was all about Rahul reiterating the same points over and over again. Things like “Women Empowerment”, “RTI” and “Rahul Gandhi” were supposedly some of the words which were supposed to be overused by Rahul. The social media was abuzz with memes about Rahul Gandhi [Source: http://www.india.com/whatever/rahul-gandhis-interview-with-arnab-goswami-the-best-tweets-and-jokes-9234/] and there was even a website totally dedicated to generating answers as Rahul would have given. [Source: http://engagedino.com/askrg]
Being a data scientist and a starter in text processing I decided to do a fun weekend project on the interview text and look for patterns and if they are correctly correlated to the claims people are making on social media. Another reason this interview was of particular interest to me because it bought 2 icons of Indian media together. It was like “an unstoppable force meeting an immovable object” [Source: The Dark Knight, 2008] and I am sure the people saw scales remaining balanced till the end.
I looked at the data from 3 perspectives:
All Data
Rahul’s Text
Arnab’s Text
This was important because I wanted to do a frequent statistical analysis and try to see if the claims on social media were correct. So I decide to answer the following research question:
“How accurate are the claims on social media about Rahul versus Arnab and what insights do they give into the personalities of the 2 involved entities ?”
With this simple question in mind I decided to first test word frequencies of all the 3 datasets and some of the preliminary results were not quite consistent with the claims and reflected the social media audience’s inclination to hang on to some catch phrases from the interview and make a whole viral campaign out of it.
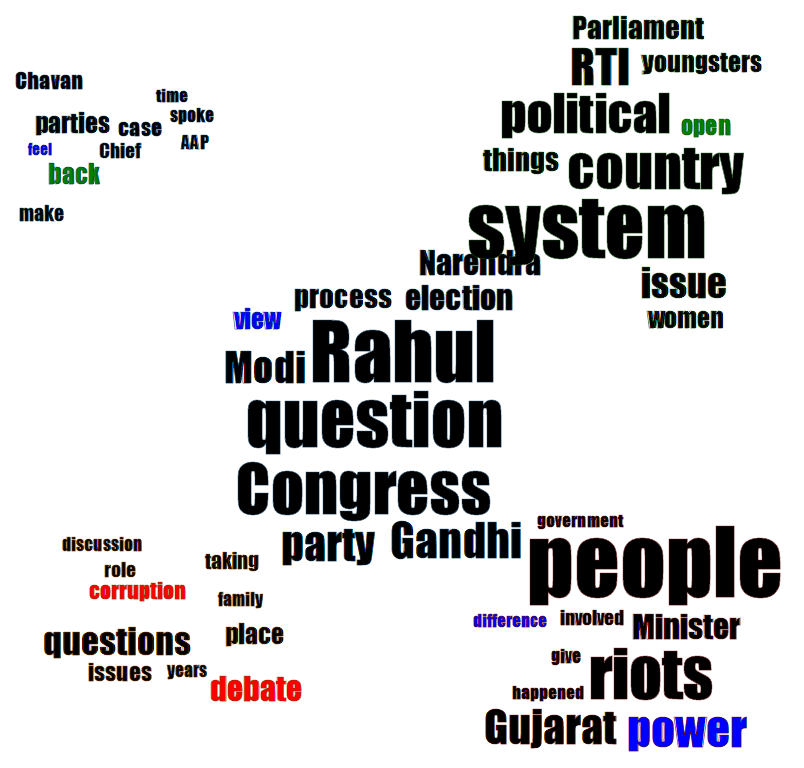
Looking at all the data cumulatively the hot topics which were quite prominent during the interview were: riots, system, RTI and Gujrat. Now this is quite understandable as Arnab was trying to focus on issues like Gujrat riots and Rahul was focused on the things related to system changes as a part of his broader perspective strategy.
A more statistical result was:
All word statistics
However, a more interesting thing I was interested was in the number of entities mentioned. This allowed me to focus on key individuals who were mentioned during the interview. And the results I got were quite interesting. Leaving out Rahul [Rahul will be discussed in detail when studying Rahul’s text independently ;)] and Congress, the other key entities were Gujrat and Narendra Modi which is also quite evident. However, the most interesting entity which surfaced was Ashok Chavan whose name Arnab used a lot of times to extract some answers from Rahul. Also 1984 and Cambridge were entities discussed quite frequently.
All Text Entities
I also constructed a network of entities which occurred together and these results reflected similar patterns. Also some people whose names were linked to the 1984 riots like Sajjan Kumar, Bhagat, Jagdish Tytler etc. were also evident from the analysis.
All Entity Network
To try to find out the central theme of the interview I did topic modelling of the text and got 5 major cluster of topics which co-occurred frequently. Apart from central theme being Rahul v/s Modi and the elections of 2014, the other important but more frequent themes were hidden mostly in Rahul’s answers regarding women issues, RTI, system and the 2 riots of Gujrat and 1984. Ashok Chavan was also frequently used during interview regarding him being shielded in the Adarsh Scam.
Frequent and important topics during interview
Once finished with the overview analysis of the text corpus as a whole I decided to dig deeper and look into the individual statements given by both Rahul and Arnab. This is the interesting dataset according to me as this will give me answers to the research question I was pursuing.
On looking at Arnab’s dataset it was quite evident that he continued his style of asking very detailed questions Arnab spoke around 5071 words as compared to Rahul’s 7460. While Arnab was focused on issues like Modi, Chavan and 1984 riots; Rahul was more focused on issues like system, people, RTI and women. However, the internet memes started to get visualized when I looked at the entity results of Rahul and Arnab. While Arnab mentioned entities like Rahul, Modi, Gujrat and 1984; Rahul’s top entities included Congress, Gujrat, India and “Rahul Gandhi” [The Rock and Stone Cold Steve Austin would be amazed at the new entry to their club]. Infact Rahul used Rahul Gandhi 11 times during his statements, more than the number of times he used Modi [6] or even Ashok Chavan[3].
Rahul’s Word StatsRahul’s Entity StatsArnab’s Word FrequencyArnab’s Entity Stats
Another interesting thing I found was that BJP and AAP were very less frequently used by both individuals, especially when compared to the the number of times Modi and Congress were mentioned.
Entity
Rahul
Arnab
Modi
6
56
Congress
59
33
BJP
3
9
AAP
1
8
Rahul Gandhi
11
90
Ashok Chavan
3
26
While Arnab’s questions revolved around topics related to Modi, Congress, Chavan and Riots; Rahul’s answers were mostly about RTI, System, youngsters in election with the central topic revolving around women issues. The central topics were not the most frequent ones but the ones which were most uniformly distributed in the whole conversation.
Arnab’s Entity NetworkRahul’s Entity Network
Rahul in his statements tried to connect Congress party to issues related to RTI, India along with focusing on its performance in various states. Rahul frequently tried to draw differences between Gujrat riots and 1984 riots. This was quite different from the entities Arnab tried to link. Arnab’s focus revolved around Modi and his comments of Shehzada about Rahul, Rahul’s performance in UP. Arnab also tried to pit Rahul against the BJP PM candidate Modi by bringing Modi’s candidature for the PM of India, quite regularly during the interview.
After getting the data I had to clean it to get it into analytically state. I decided to split it into 3 separate data-sets:
Full text of Interview
Only Rahul’s Text
Only Arnab’s Text
I used the tool called ConText for data analysis like word stats, entity stats, network generation and topic visualizations along with some python scripts for parsing the data. And I created the visualizations in Gephi using centrality measures for Node sizes [Degree] and Label Sizes [Betweenness] and modularity classes for node coloring.
Interactive Charts of the images presented above along with full analytics data can be found at:
After doing this basic analysis I realize I figured out that even though the topics which were not frequent but were uniform in the discussion they became more popular in social media. Rahul’s usage of women empowerment, RTI and “Rahul Gandhi” were caught by social media enthusiasts and made viral. However, this also led to many other important topics and issues being hidden beneath this viral sharing. Key individuals like Ashok Chavan, Virbhadra and some scams which were mentioned were not caught by the social media audiences.
Another important observation was regarding evading of questions by Rahul and how less he tried to answer to the point or pointing out the individuals who he was supposed to give statement on. Even though it is a perfectly safe and good strategy to answer in a positive tone mentioning issues which one envisions; I would say that when it comes to personal interview being a bit more specific and elaborate on the questions at hand is more important. As the statistics reflected the platform appeared more to me as a means to talk more about what he is planning for the future and has done in the past than about what are the key things at in the current political scenario. Overall the claims on social media were quite accurate.
Finally, I still feel there are lot more things which can make this analysis more useful and interesting. Some ideas I have but can’t implement because of lack of time [PhD studies ;)] are:
Word correlation on for each question and its corresponding answer
Language model for Rahul Gandhi’s answers and Arnab’s question [the latter can be done more easily because of the abundant dataset available]
Sentiment tracking for each entity and in what way the answer’s were given.
Fun Bites
Today only I also happened to see this quite dramatic reconstruction of the whole interview by Cyrus Broacha. I think the language model for both Rahul and Arnab would have greatly improved the video.
Legals
This article is my personal analysis and opinion on the issue at hand. I have cited sources from which I have taken the data and the tools I have used. If anyone plans to reproduce this article or my analysis on their site, please give a link back.
If you agree or disagree, or have thoughts to add to my analysis or want to answer more broader questions to my analysis related to light bulb changing labor forces and chickens crossing the streets. Please feel free to use the comment section.
Also, humor and analysis were some of the key elements I thought of while writing this piece and I am pretty sure I ended up doing the later relatively more than the former.
I enjoy using git because of its simplicity and speed. Recently, I have been working on a project of ours which uses SVN as a default version control system.
I proposed to my team to switch to Git as we can also use GitHub after that for making our code public. So, I decided to take the initiative to convert our SVN repository ready for GIT. There were 2 solutions to this:
I use the latest stable code and then check it into the latest GitHub repository.
I convert the whole SVN repository into Git repository.
I wanted to do the latter as I want to ensure that the commit logs are maintained across the clone.
However, I was looking for some Windows based solution which is easy to use and GUI based as I have to show it to my team as well. So, I decided to use TortoiseGIT [https://code.google.com/p/tortoisegit/wiki/Download?tm=2] which is a Windows based tool for git repositories.
Here are the steps I used using tortoiseGit to clone my SVN repository as a Git repository.
Install TortoiseGit
Create a new folder where you want to clone the repository.
Now right clock on the folder and select the “Git Clone …” option.
You will see a clone screen. Choose “From SVN Repository” and uncheck all boxes.
Click OK.
It will take some time depending on your SVN repository size but in the end you will be presented with a Git repository in your folder.
One problem which you will face is that now in the tortoiseGIT menu you will see SVN options as well.
In order to remove that the following steps provide a solution:
Create a bare git repo using git init –bare
Add this repo as remote to the SVN pulled repo.
Push the SVN pulled repo to the git bare repo.
Now clone the bare git repo to a new repo.
New repo will not have SVN options.
Using git-hooks to update the cloned repo when the bare repo is updated.
Inside hooks folder in the bare repo create a file post-receive
Add the following content to the post-receive file
#!/bin/sh
cd /home/<user>/<test_repo>
GIT_DIR=.git git pull origin master
Now whenever you push something to the bare-repo then the changes are already reflected in the git repo whose path is given in post-receive file.
I have recently installed the Fedora 18 to my HP Envy 4 1002tx laptop which comes with AMD Radeon HD 7670M (2 GB DDR3 dedicated) with GNOME 3.6.2 and after logging in I was facing sever overheating issue and the laptop fan was making heavy noises. The overall battery backup was also getting reduced to some 1 hr 50 minutes.
The overheating was so sever that it was impossible to put my laptop on my lap as it was almost burning my legs.
I also tried installing the ATI radeon drivers using all the various methods like:
kmod-catalyst
akmod-catalyst
Official driver for linux from ATI site.
In all cases I ran into config issues because of which I was unable to boot into GNOME. These could only be resolved after deleting the Xorg.conf file.
After using all the 3 approaches above on rebooting I lost the gnome shell and my system will not bring up gnome. After deleting the xorg.conf I was able to get into gnome but was only presented with the downgraded version of gnome in which the system settings feature stopped working.
I like the gnome 3.6.2 interface and would want to stick to it that is why I am still running my laptop in Fedora irrespective of the overheating issue.
In the process I also got to know about the GNOME Shell Extensions where I found a plugin called Radeon Power Profile Manager . I installed it by enabling GNOME Shell in my browser and clicking on Toggling the ON-OFF switch next to the plugin name.
After installing the plugin I just checked if the power management in my machine is set to profile or not. This can be down by:
After installing the plugin I could see it in my top-bar as an option where I clicked on it and choose the Set profile to “low” option. Radeon Power Profile Manager
After using this plugin my CPU temperature came back to normal in 15 minutes. And now it it working at a very optimum temperature.
UPDATE: Better method:
The last method was good but somehow I was not seeing significant effects as the extension was crashing after I rebooted. So after a lot of searching I found a better method which has given me better results than the last solution.
All you need to do is run the following commands:
modprobe radeon
chown -R $USER:$USER /sys/kernel/debug
echo OFF > /sys/kernel/debug/vgaswitcheroo/switch
After this you can run sensors. I saw a drop in Physical id temperature from 72 C to 52 C which is quite good.
However the solution is only temporary and will be lost if you reboot. So you can put this script in rc.local and then it will be applied each time you boot into your machine.
Edit your /etc/rc.d/rc.local with the following commands:
#!/usr/bin/env sh

modprobe radeon
echo OFF > /sys/kernel/debug/vgaswitcheroo/switch
And then enable it by running the following commands:
systemctl enable rc-local.service
systemctl start rc-local.service
systemctl status rc-local.service # Check the status if its running or not.
So after days of searching I finally found the solution. Thanks to Stunts for making this plugin available. The full documentation for the plugin can be found at:


You must be logged in to post a comment.